
We are pleased to announce the release of HelpSmith 9.1 (which you can download from our website) that adds a synchronization tool for translated projects, includes the ability to import styles from another help project, provides advanced options for importing content with styles, adds a theme preview for easier Web Help customization, the ability to replace styles in topics and templates, and other enhancements.
Synchronization of a Translated Help Project
When you need to translate a help project into a different language, you can create a copy of the original help project and translate topics and other texts in it. However, when changes are made to the original help project, you will then need to synchronize the translated help project copy with it.
In HelpSmith 9.1, you can now use the enhanced Project Merge feature (File|Merge) which compares the source and destination help projects and allows you to select the Merge Mode for new and existing topics automatically. Beside that, you can now also mark the topics which are missing in the source help project, so you can easily identify and delete the outdated topics in the destination project as well.
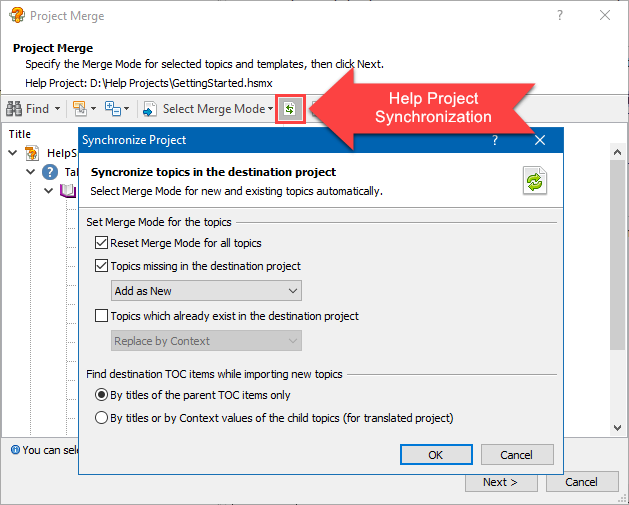
It should be noted that while importing new topics from the original help project, the Project Merge tool can now determine the corresponding parent nodes in the Table of Contents (TOC) not only by titles, but also by analyzing the child topics that they contain. As a result, if the destination help project has the same TOC structure but different titles (which are written in another language), the new topics will still be added into the right locations!
Import Styles from Other HelpSmith Projects Easily
The new HelpSmith update allows you to import styles from other help projects easily, which can be useful if you need to import individual styles from an existing help project into the help project that you are currently working on, or if you maintain different help projects and need to use the same set of styles in each of them.
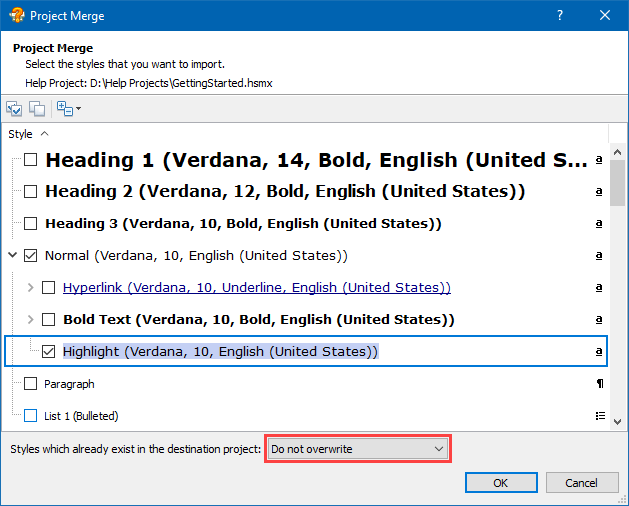
The Import Styles feature (File|Merge|Import Styles) allows you to control how to import styles with names that already exist in the destination help project. For example, you may want to ignore the already existing styles, overwrite the existing styles, or import them as new styles with re-defined names.
Mark Imported Topics with User-Defined Statuses
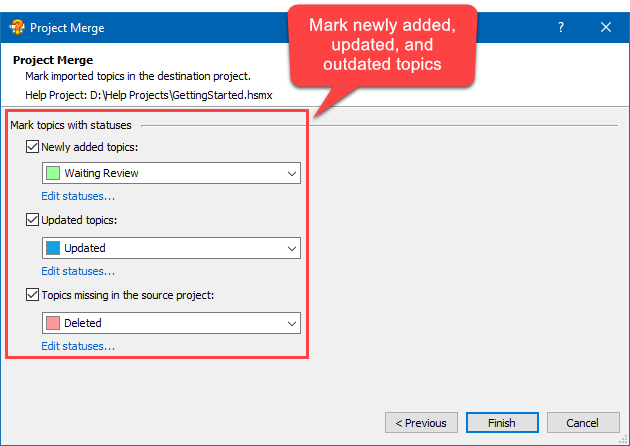
Another enhancement to the Project Merge feature which you can find in HelpSmith 9.1 is the ability to mark topics imported into the destination help project by using different statuses and colors.
For example, after you have imported topics from another help project, you can now use statuses to easily identify the newly added topics, updated topics, and, if necessary, the outdated topics which are missing in the source help project.
As you may know, in HelpSmith, you can use the Project tab|Select Nodes command (or the Select command which can be accessed by right-clicking on the Project Manger pane) to select topics by status. This can be useful when you need to find the topics of a specific type, or to perform some operation on multiple topics simultaneously.
Advanced Options for Importing Content with Styles
If you need to import topics or templates from another help project into the current help project, the Project Merge tool allows you to import the styles used by the imported content automatically.
In HelpSmith 9.1, you can now specify if you want to link imported content to the existing styles in the destination help project, overwrite the existing styles by using the styles from the source help project, and also if you want to import styles that do not exist in the destination help project.
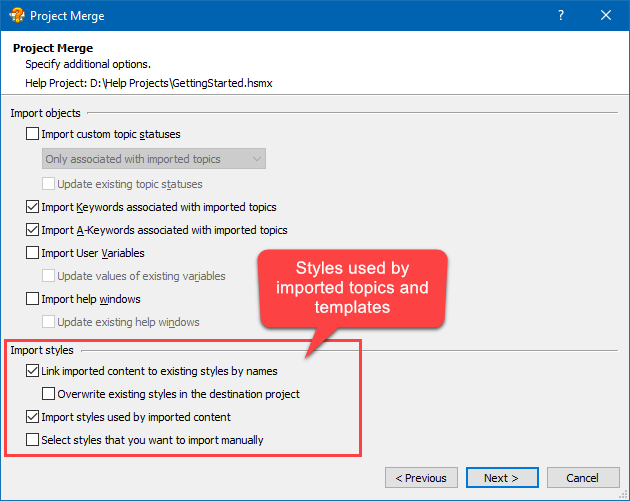
Thus, you can import content and easily format it by using the styles of the destination help project, apply the original styles of the source help project, or, if necessary, import content without any styles at all.
Instantly Preview the Customized Web Help Appearance
HelpSmith allows you to customize the look and feel of the entire Web Help system by selecting one of the existing style schemes, or by editing style settings of individual layout’s elements, such as Header, Mobile Header, Footer, Tabs, TOC entries, etc.
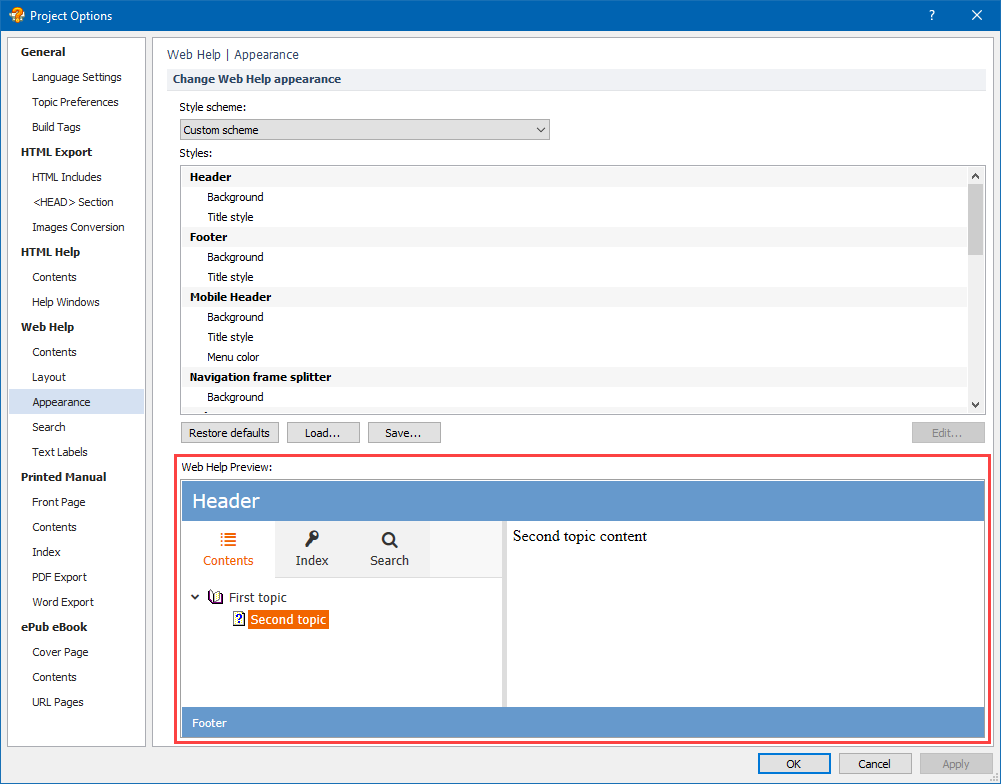
While editing formatting settings of a style scheme, HelpSmith 9.1 allows you to preview the Web Help system’s appearance instantly without the need to re-compile your help project. Thus, the new HelpSmith update makes the customization process even easier!
Create Hyperlinks for Variables in Topics
HelpSmith 9.1 makes it possible for you to apply hyperlinks to variables located in the text of help topics or templates, which is similar to applying a hyperlink to regular text, or to an image.
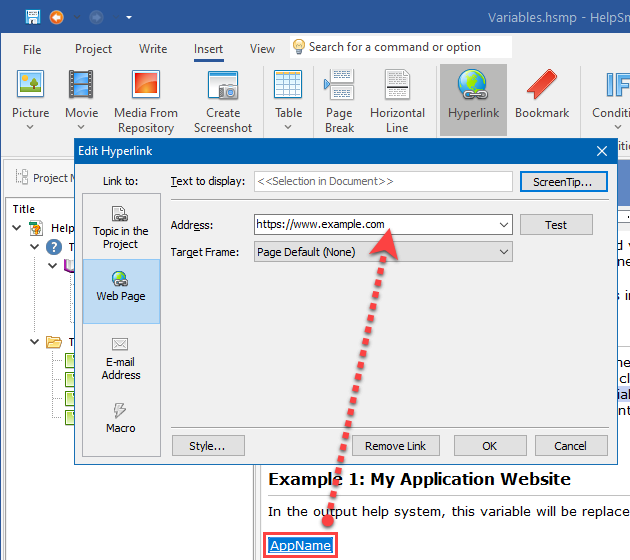
Thus, you can insert a variable into a topic or template that will not just display some value (e.g. current topic’s title, current date, product name, etc.), but will also work like a hyperlink linking to another topic or external webpage.
Replace Styles in Topics and Templates Easily
In HelpSmith 9.1, it is now possible to find content with a specific style in topics and templates, and link it with another style.
The Replace Style feature makes it possible for you to replace styles without the need to check every topic manually. Also, when you paste content from another application, you can now easily replace the styles used by that content with the actual styles of your help project.
How to Use the Replace Style Feature
- In the Styles pane, right-click on the style that you want to replace, and then click “Replace Style”.
- In the “Replace with Style” box, specify the style by which you want to replace the first style.
- In the “Replace style in” box, specify where you want to replace the style.
- Click Replace Style.
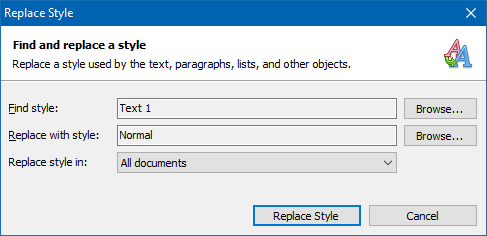
It should be noted that the Replace Style feature allows you to specify if you want to replace the style in the current topic (or template) only, or in all the topics and templates of your help project.
Select the Preferred Clipboard Format when Pasting Images
When you paste content from other applications into HelpSmith through the Clipboard, you can use the Paste Special (Ctrl+Alt+V) command that allows you to select the format which you prefer.
In addition to the ability to select the preferred format for text (for example: Formatted text, Unformatted text, etc.), when you are pasting an image, you can now select the preferred graphical format (for example: Bitmap, DIB, PNG, etc.), which can be useful in some cases.

Please note that since HelpSmith can automatically convert pasted images into the desired format, if you need to insert an image in a specific format from the Clipboard, you may need to disable that option in program settings at: File|Options|Images
Release Notes for HelpSmith 9.1
- You can now synchronize topics in a translated help project with the original help project.
- The Import Styles feature allows you to import selected styles from other help projects.
- The Project Merge tool includes advanced options for importing content with styles (linking to existing styles by names, overwriting existing styles, etc.).
- It is now possible to mark new topics, updated topics, and missing topics with different statuses.
- Web Help: you can now preview the selected style scheme for easier customization.
- You can now create hyperlinks for variables in the text of topics and templates.
- The Replace Style feature allows you to find content with a specific style in topics and templates, and link it with another style.
- The Hyperlink Style dialog now allows you to control if you want to set the selected styles (Regular, Active) as default styles for new hyperlinks.
- In Project Manager, you can now use the “Open File Location” command to access the .XML file of a specific topic (available in a help project saved in the .HSMP format).
- When adding a new topic status, HelpSmith now automatically suggests a random color.
- When pasting an image from the Clipboard, the Paste Special command (Ctrl+Alt+V) now allows you to select a preferred image format.
- The HTML Attribute dialog now saves the list of previously used attribute names (for example: id, class, etc.).
- The Phrase search mode in Web Help did not find topic titles in the TOC.
- When pasting an image from an MS Word document into HelpSmith, the image size was incorrect in some cases.
- The Image Properties dialog now checks the image size to avoid the “Out of Resources” error.
- When deleting a style which is used in topics or templates, a confirmation is now required.
- The Language value for some locales was not saved properly in the XML-based help project formats.
- HTML Code insertions did not link to the appropriate HTML Code entries after loading the help project in some cases.
- The Go To feature (Ctrl+G) now allows you to find topics by partial occurrence of the textual ID, not by full match.
- Other enhancements and minor bug fixes.
How to Upgrade?
If you have a license for HelpSmith 9.x (or for a previous version for less than a year), you can upgrade to the latest HelpSmith version (the same edition) for free. Otherwise, you can upgrade existing licenses to HelpSmith 9.x at a special price. To place an upgrade order, you can visit this link.
Download HelpSmith
You can download the latest HelpSmith version here.