
We are pleased to announce the release of HelpSmith 11.1 (which you can download from our website) that lets you manage images and video files directly in the main HelpSmith window, offers enhanced drag-and-drop support for various user actions, includes improvements to the syntax highlighter tool for developer documentation, improved behavior of tables in the topic editor, and other enhancements.
HelpSmith is a help authoring tool that combines an intuitive, user-friendly interface with powerful functionality: a text editor with a Format Painter tool and styles (including table styles) to format your content quickly, a built-in Image Tool with customizable screenshot annotations, and an open XML-based project format compatible with version control and external translation tools. In this update, we’ve simplified media file management, added drag-and-drop support for image insertion, and made creating hyperlinks and other actions even easier. As a result, HelpSmith 11.1 makes the documentation creation process more comfortable and efficient for users.
Take Advantage of the Media Repository Integrated in the HelpSmith Main Window
In HelpSmith 11.1, we’ve completely revised the process of working with the media repository and moved image management of your help project to the main application form. Thanks to this approach, you can now easily add, edit, and organize images and videos while working on documentation without having to switch to a separate window.
In addition, the media repository now allows you to view thumbnails of images, so you can preview and identify a specific media file in the list. If necessary, you can choose between different sizes of thumbnails, including a simple file list without thumbnails, medium, large, and extra large.
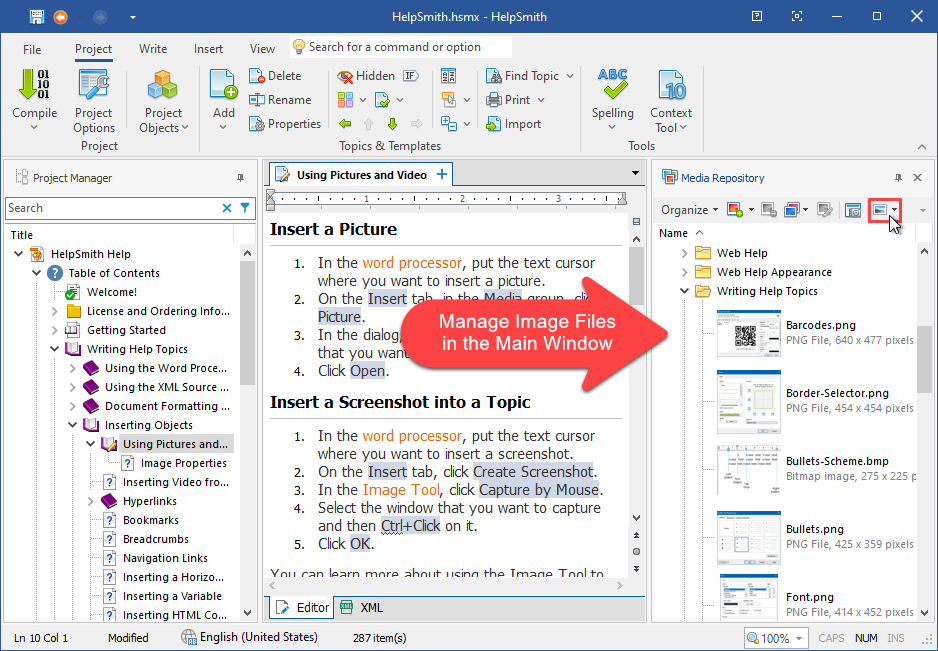
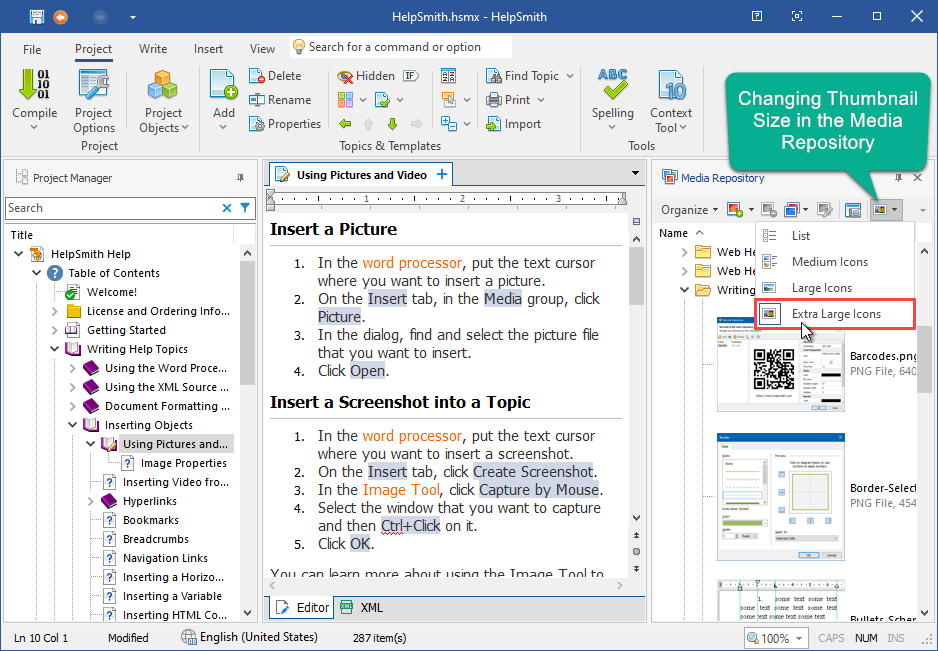
Thus, the media repository panel makes working with the project and managing images and video files even more convenient. Combined with improved drag-and-drop support, the process of including media files to the help project from a file manager, as well as inserting images into the topic editor can now be done with just a couple of mouse clicks.
Remark: It should be noted that when you click Project|Project Objects|Media Repository to access the media files of your help project, HelpSmith now simply shows the new media repository panel in the main form. However, if you select an image file as a background for a template or another object, or change the path of an image object in the editor, HelpSmith displays the previous Project Media window that works as a dialog box.
Easily Add Images, Insert Hyperlinks, and Move Content with the Enhanced Drag-and-Drop Support
In addition to the multi-tab editing and other user interface improvements, HelpSmith 11.1 offers enhanced drag-and-drop support in the topic editor and media repository, which makes the process of working on your documentation much easier and more user-friendly.
For example, when writing a help topic, you can drag and drop content from one place to another place within the document. You can also insert image files by dragging them from Windows Explorer or another file manager. Additionally, you can drag content between Microsoft Word and other applications.
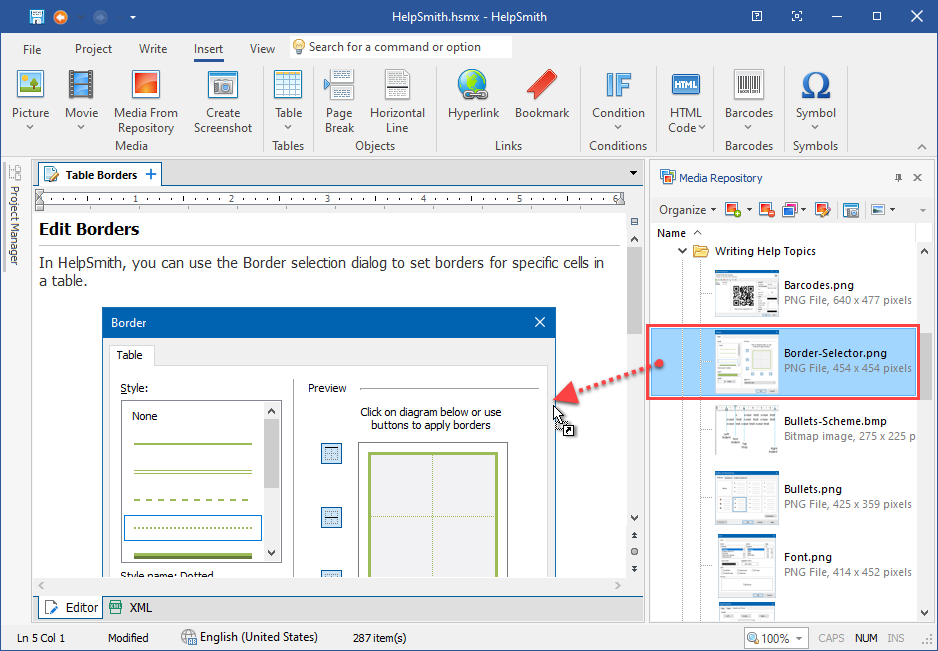
In the media repository, you can add one or several images from Windows Explorer (or from another file manager) by dragging the needed image files directly into the target folder. So you can avoid the need to navigate to your image folder each time through the Open dialog.
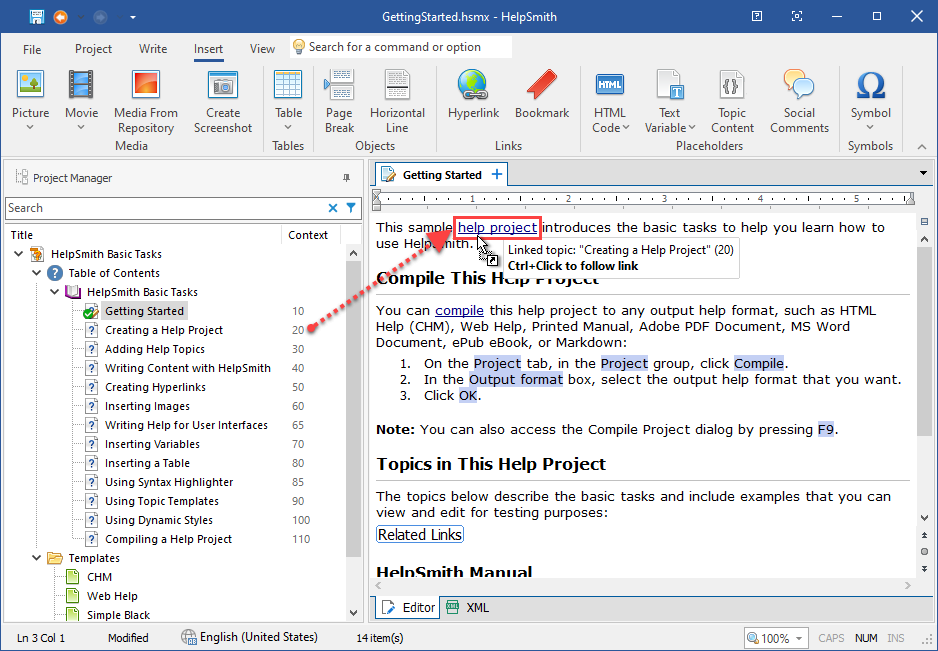
In addition, you can now easily create hyperlinks by simply dragging and dropping the desired topic into the document. Alternatively, you can also select a text fragment and drag it to the desired TOC item (topic, URL link, etc.) to create a link. Compared to the regular Hyperlink dialog, this saves a lot of time because the desired hyperlink can now be created quickly.
Finally, if you need to open a topic in a separate tab, you can now simply drag and drop that topic from the Project Manager to the Tabs bar.
Generate Fully Qualified Names (FQNs) for Your Developer Documentation Effortlessly
When creating documentation for developers, you may need to describe the properties of classes, methods, and other relevant attributes. If the topics in your Table of Contents (TOC) reflect the structure of the software’s classes and methods, in HelpSmith 11.1, you can easily generate fully qualified names (FQNs) by right-clicking on a topic in the project manager.
Of course, if you want to display the topic path in the compiled documentation, you could use a breadcrumb object that can be inserted into both a specific topic or into a common template. In the breadcrumb settings, you can customize the format, style, and delimiter for displaying the current topic’s path.
But if you need to generate the fully qualified name (FQN) directly during the documentation creation process, that is, in design time, then you can simply right-click on the desired topic in the Project Manager. HelpSmith will automatically copy the entire hierarchy of the selected topic as a string.
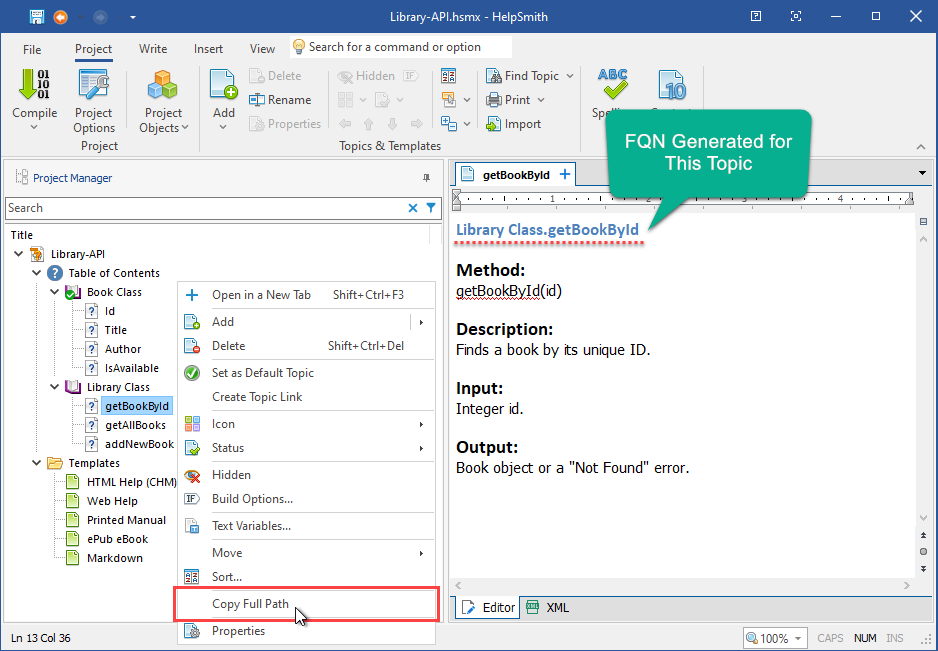
To copy the path of a topic to the Clipboard:
- In the Project Manager pane, right-click on the topic that you need.
- In the popup menu, click Copy Full Path.
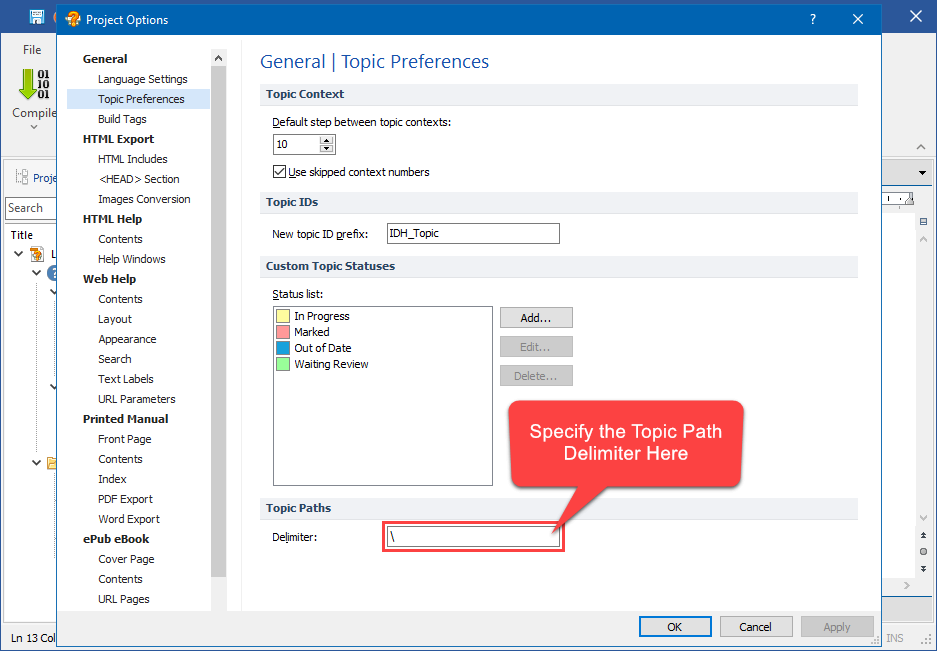
Finally, if you need to change the path delimiter (for example, slash, period, etc.), you can do so in the topic preferences section at: Project|Project Options|General|Topic Preferences
Thus, HelpSmith helps you easily generate the path to a topic (or fully qualified name of an entity), and use it within or outside your help project without having to type this path manually every time.
Seamlessly Copy Syntax-Highlighted Code from Developer Sites
With HelpSmith, you can create various types of documentation including procedures and step-by-step instructions using the powerful editor that provides support for full-featured styles, UI documentation with the excellent screen capture and image annotation tools, and also developer documentation thanks to the syntax highlighter available for all the major programming languages.
When you apply the Syntax Highlighter tool (by clicking: Insert tab|Syntax Highlighter) to the selected text in a topic, HelpSmith will automatically convert it into a customizable code block using the appropriate syntax highlighting scheme for the selected programming language (for example: ?++, Python, etc.). This allows users to easily view and understand the program code published in the help system.
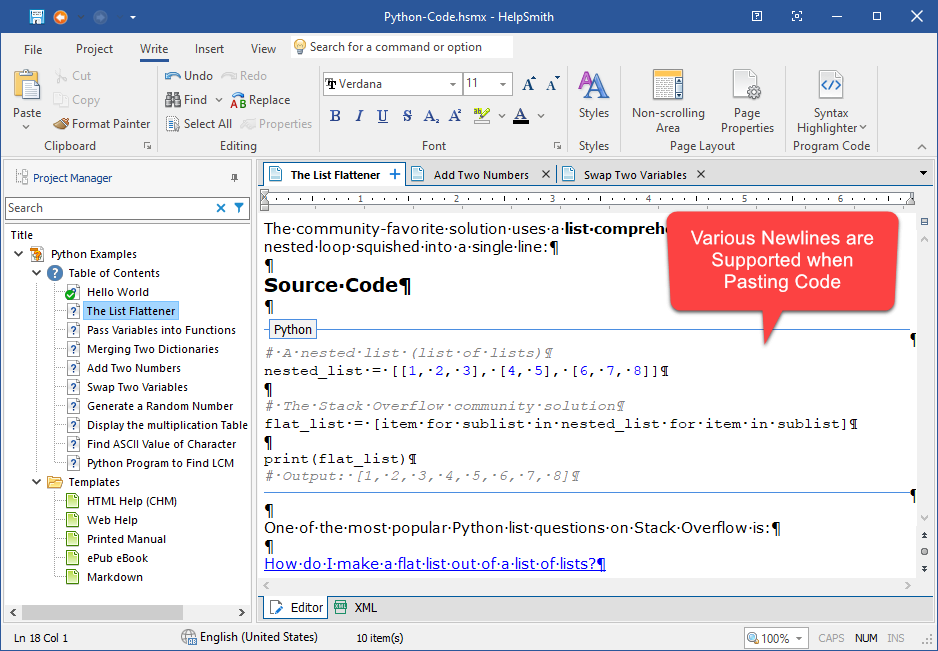
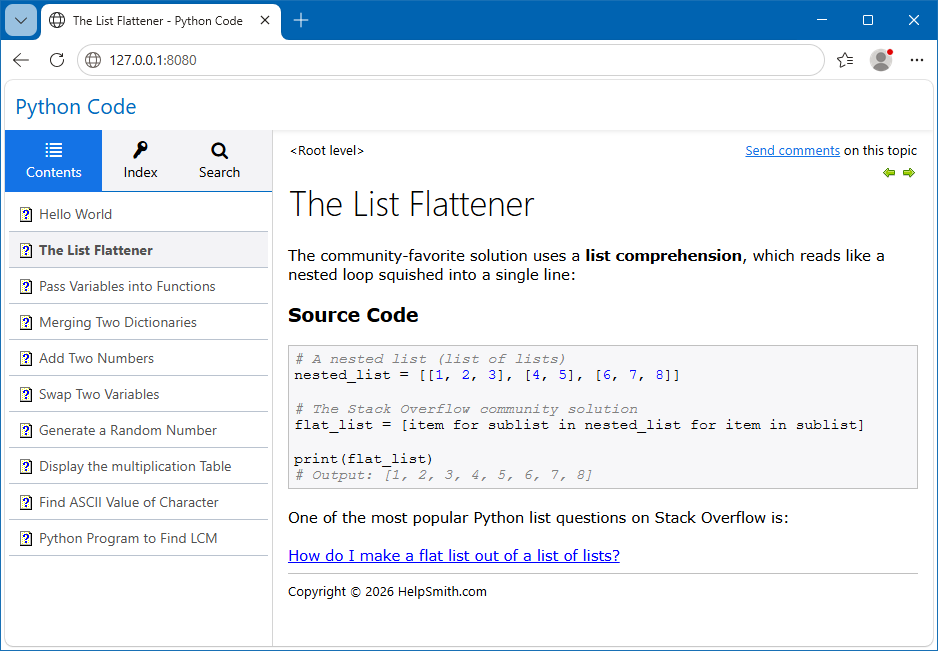
Because the Syntax Highlighter tool considered each paragraph as a separate line of code, it could be a problem when copying code from different websites. For example, if a website (such as GitHub, MSDN, StackOverflow, Medium, etc.) uses line breaks instead of paragraphs, all the code could be incorrectly converted into a single line. To address this issue, HelpSmith 11.1 uses an improved algorithm allowing the syntax highlighter to correctly handle various newlines, including separate paragraphs and line breaks.
Thus, the new HelpSmith update enhances the compatibility of the Syntax Highlighter tool with popular platforms, making it easier for technical writers to create developer documentation.
Streamlined Working with Tables in the HelpSmith Topic Editor
When working with tables in HelpSmith, we usually recommend using table styles: this lets you easily set up a unified appearance for multiple tables in a single place. For example, in a table style, you can define formatting for the table’s header row, total row, first column, and other elements. And when needed, you can update the design for all the tables in the entire documentation by editing that style.
However, even if you don’t use table styles in your project, HelpSmit keeps your workflow as simple as possible. In the table properties, you can quickly adjust the width, spacings, background, cell borders, and other parameters. And thanks to the feedback from our users, in HelpSmith 11.1, when you insert new rows or columns, the editor now automatically copies the formatting of text in the cells from the previous rows or columns.
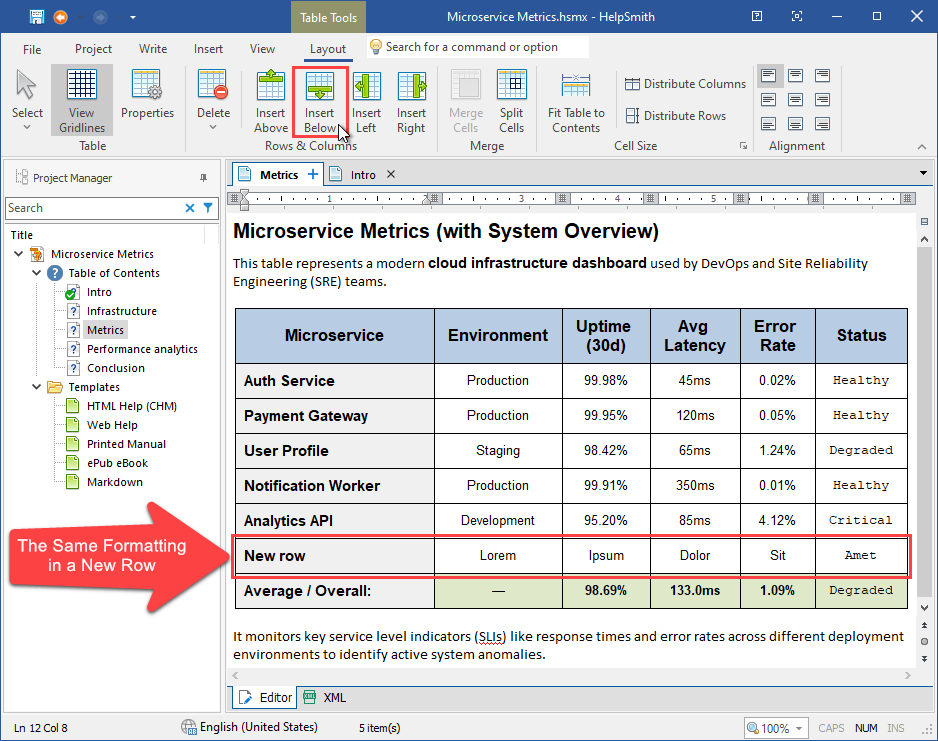
Thus, if the table were linked with a table style, it would simply get the formatting settings from that style. But if you apply formatting manually without using a style, HelpSmith 11.1 makes working with tables easier as you no longer have to manually set the formatting for each new cell.
Release Notes for HelpSmith 11.1
- Now you can use the integrated Media Repository panel to manage your image and video files directly in the main HelpSmith window.
- You can now view image thumbnails in the Media Repository’s file list.
- The ability to insert images into a topic by dragging media files from the Media Repository panel or Windows Explorer, etc.
- Added an option to create hyperlinks by dragging a topic to the selected text, or by dragging the text onto a topic.
- You can now open a topic or template in a separate tab by dragging it to the tabs control.
- It is now possible to open a help project by dragging the project file from Explorer into HelpSmith.
- The editor now allows you to drag and drop content internally and between external applications.
- The Syntax Highlighter now correctly handles different line breaks when pasting code from popular websites.
- The Project Manager adds a Copy Full Path command for generating Fully Qualified Names (FQNs) at design time.
- Inserting new rows or columns into a table now copies text formatting from the previous cells.
- Fixed minor issues with the Background dialog when editing table properties.
- Fixed an issue importing certain Markdown documents with code blocks.
- Other enhancements and minor bug fixes.
How to Upgrade
If you have a license for HelpSmith 11.x (or for a previous version for less than a year), you can upgrade to the latest HelpSmith version (the same edition) for free. Otherwise, you can upgrade existing licenses to HelpSmith 11.x at a special price. To place an upgrade order, you can visit this link.
Download HelpSmith 11.1
You can download the latest HelpSmith version here.